Turning Green Wood
Have Fun Making Ribbons!
The advantages of turning green wood are that it’s easier, less dust is created, its cooler on your tools (meaning less sharpening) and just plain fun. Let's hear it for turning green wood!
When you receive your wood turning bowl blank, you can rough turn your item to speed the drying process. I use the 10% rule for wall thickness, but always leave it at least 3/4” thick when turning green wood. For example, when I am turning a 10 inch bowl, I will leave it one inch thick. A 20 inch bowl will be 2 inches thick.
Mount the blank to your lathe between centers using a proper size spur drive in relation to blank size. Turn the outside of your item to its basic shape making a tendon for a chuck at this time. Remove the item from your lathe and remove the spur drive. Turn item around and remount using your preferred method. I use “Oneway” brand Strong Hold Chuck. I would then true the outside shape before hollowing the inside in case of change from spur drive set up to chuck set up. Begin hollowing out the center using the 10% rule of wall thickness. The inside should be of uniform thickness following outside shape to minimize checking and excessive stress during drying. Even wall thickness will encourage even drying and limit warping when turning green wood.
If using a faceplate instead of a spur drive, you can turn the outside to your basic shape and then begin hollowing following the above directions.
When the hollowing is finished, use your preferred method of drying. I like to use Pentacryl Wood Stabilizer on my rough-turned green wood. We now sell this product and it is one that I would never be without in my shop. I use it on everything except the Indian Rosewood as this is such a stable wood that it's not needed. Pentacryl will help keep wet woods from splitting, cracking and shrinking. It also speeds the drying process. I use a paint brush to apply Pentacryl to the inside and outside of the item. I don't immerse and soak my item in Pentacryl as the company directions state since it then takes forever to dry. I then put the item in a paper bag for two to three days, then remove item from bag and store it out of sunlight & direct air movement till dry.
To be honest, I no longer bother to keep a weight log but you can keep a log of the weight of your drying projects if you'd like. Weigh your piece once or twice a week and record the weight in your log. After weighing your rough turned blank and finding no change in weight for three times, the moisture level has stabilized. An easy way to test if your item is dry is to try sanding it. If your sandpaper loads up, it's not dry enough.
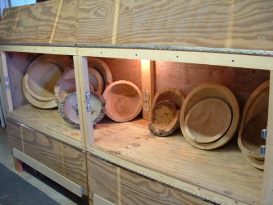
When the rough turned bowls have dried sufficiently, remount on your lathe to complete the final turning, sanding and finishing.
Take the time to rough turn a bunch of items for drying. As you finish turn some dried items, add more rough turned items to your stash and you'll always have projects ready for finish turning.
Try turning green wood and see if you enjoy it as much as I do!
Return to Ideas and Tips
Return from Turning Green Wood to our Wood Inventory
Return to Woodturning Blanks 4 U Home Page
