|
Norfolk Island Pine Tips!
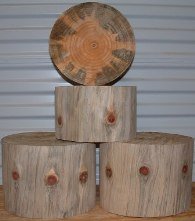
Norfolk Island Pine tips, read this for a better woodturning experience? Remember, no two pieces of Norfolk Island pine will be exactly the same. This was a growing tree so we have no control over its growth characteristics, such as how many limbs/knots it has, or if they are in an even row or was the limb damaged when the tree was young making the branch shorter or a different color on the inside. We try our best to see that each piece has at least four knots, but they can have as many as 7 or 8. Not knowing what our customers are going to make with the woodturning blank they order, we try to leave enough wood on either side of the knot so the piece can be used as either a bowl blank or a closed form blank.
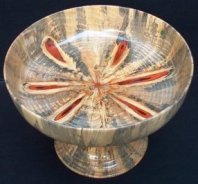
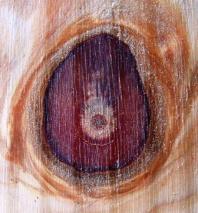
 The limbs of the Norfolk Island pine naturally grow on an angle within the tree. For an easy way to determine the angle of the limb (knot) look at the limb center or pith. You will notice it is off center in the limb. If the pith is off center towards the top of the limb as shown in this picture the limbs are running on a downward angle to the center. This is the limb location used to make bowls or similar items in which you want to see the limbs in the bottom of bowl. Some turners refer to this as the flower or wagon wheel spokes. When making a bowl, begin by turning the inside of the bowl first. You will want to just begin to expose the branch pattern. Then rough turn the outside of the bowl. The limbs of the Norfolk Island pine naturally grow on an angle within the tree. For an easy way to determine the angle of the limb (knot) look at the limb center or pith. You will notice it is off center in the limb. If the pith is off center towards the top of the limb as shown in this picture the limbs are running on a downward angle to the center. This is the limb location used to make bowls or similar items in which you want to see the limbs in the bottom of bowl. Some turners refer to this as the flower or wagon wheel spokes. When making a bowl, begin by turning the inside of the bowl first. You will want to just begin to expose the branch pattern. Then rough turn the outside of the bowl.
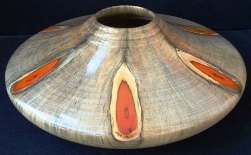
 If the pith is off center towards the bottom of the limb as shown in this picture, the limbs are running at an upward angle to the center. This woodturning blank would be used to make the closed form shown below or similar items where you want to see the limbs on the top as shown in this picture. Decide which type of item you are going to turn to determine which end of the wood turning blank you will make your tendon on or whatever mounting method you use. I enjoy the challenge of making this type of closed form. This one measures 10" in diameter by 3 1/2" in height.
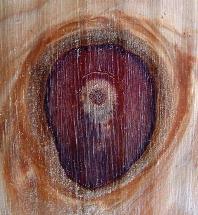
Turning an end grain blank is opposite of turning side grain. When making a Norfolk bowl, begin rough turning the inside of the bowl first, not the outside. This will allow you to turn until you begin to see the branch pattern appear. Remember that this is end grain so tear out is common. Tool choice is important, do not use scraper type tools, sharpness, speed of lathe and size of cut are critical. The number one thing to remember when turning end grain is that you can’t turn it as you would a side grain piece. You can’t cut head stock to tail stock as in side grain. You must cut across the bed from front to back or back to front, not like side grain which is left to right in the same direction as the lathe bed. SPALTING NORFOLK ISLAND PINE In central Florida, spalting of Norfolk Island pine will occur just by leaving the wood outside, but out of the sun. In a whole log it usually takes about three months to spalt, spalting begins on each end working its way towards the center. Since we process a whole log at one time, some woodturning blanks can be heavily spalted and others just starting. I prefer spalted, the more spalting the better. If when your woodturning blank arrives, it isn’t spalted enough for you, it’s easy to increase the amount of spalting. Rough turn your Norfolk Island pine item; read our "how to" article. Place it in a plastic kitchen or yard waste bag. Store it out of the sun. Every couple weeks open the bag to check its progress. If left long enough it will turn almost completely black. Be prepared for a bad looking piece of wood when you open the bag after it has been sealed up for about a month. Just wash off the slime and mold. Now use your preferred stabilizing and drying method. I prefer to use Pentacryl Wood Stabilizer at this point. If you choose not to use Pentacryl, spray a couple of quick coats of any clear lacquer on each knot, both sides if exposed as in a bowl. I use clear Krylon from Wal-Mart. Let this dry, then use CA glue and cover each knot plus ¼ inch outside the knot CAREFULLY KEEPING THE GLUE ON PREVIOUSLY SPRAYED AREA. Sealing the wood with the spray lacquer will keep you from getting those dark glue lines caused by the glue soaking into the wood. I also spray and glue the center pith area as on this tree it is sometimes soft. Gluing the knots will keep them from shifting or cracking during the drying period. If I am just rough turning and not looking for more spalting, I always coat the inside and outside of my rough turned Norfolk Island piece with a couple of coats of Pentacryl Wood Stabilizer. I use this product on almost everything that I rough turn. Just remember, once Pentacryl is applied, the spalting process stops. I always rough turn my NIP first and don't just finish turn it green, as finish turning green is much more unstable causing warping and knots (limbs)to shift. While the piece is still mounted on the lathe, I place an old cake pan underneath it to catch any drips. I then brush the Pentacryl Wood Stabilizer on both the inside and the outside of the piece. Put the rough turned NIP in a paper bag for 2-3 days, take it out of the bag and store it out of your way but protected from sun or heat/ac blowing on it. Here in Florida, mine is usually dry enough to finish turn in four to six weeks. I check dryness by rubbing a piece of sandpaper on it. If it loads up the paper, it's not dry enough if it doesn't load up, it's ready to finish turn. Your drying time will depend on your location's weather. If I could use this product on only one type of wood, it would be Norfolk Island pine. There is almost no cracking or warping. It seems to take away that little extra challenge called tear out that you get with end grain turning. It also makes sanding so much faster and easier. Pentacryl penetrates the wet wood and mixes with the water molecules. Drying time for green wood can be reduced by up to 90%. I hope these Norfolk Island Pine tips will help you with your next woodturning project. The completed pieces are beautiful and are my top-sellers at the galleries where they are displayed.
Return from Norfolk Island Pine Tips to Norfolk Island Pine Turning Wood |